
Today’s tutorial is a little different, but it’s based on a question I get all the time. “How do I read this pattern?” This means today I’m going to go over how to read that pesky peyote word chart that came with your pattern. I will be talking about how to read the graph in the next tutorial, so if that’s more your cup of tea, it’s coming soon.
In this tutorial, I am going to be focusing on even count peyote stitch, but will be covering other stitches in future tutorials. Let’s get started.
So maybe you are new to beading or maybe you are just new to patterns. I know I learned how to do basic stitches before I ever figured out how to read a pattern. I remember my first few attempts at following a pattern. It didn’t go well. I don’t think it helped that I decided the first pattern I would try would be a large tapestry. Looking back I see now that it really wasn’t the best choice for my first attempt.
To save you that frustration, I’m going to walk you through how to read that pattern and get you started on a peyote project.
This tutorial is for beaders who already know how to do even count peyote stitch. If you are looking for a basic peyote tutorial, please see my tutorial here.
Materials
- Beads – I use Perler beads for this project, but any cylinder bead would work
- Needles
- Thread
- Word Chart
And if you are looking for some awesome patterns, just stop by my Etsy shop and check out all my patterns. I suggest a simple pen wrap or small bracelet to get started with. Something that won’t be too overwhelming. Well, that’s enough self-promotion, let’s get on to the tutorial.
How to not lose your place in a pattern
As always there is both a video and a written tutorial because I know that everyone learns a little bit differently. If videos aren’t your thing, just scroll down to see the written tutorial.

Here is the little pattern we are going to follow today. Just a simple even-count peyote project. I have used a different color for each row, this way you can visualize the word chart more easily.
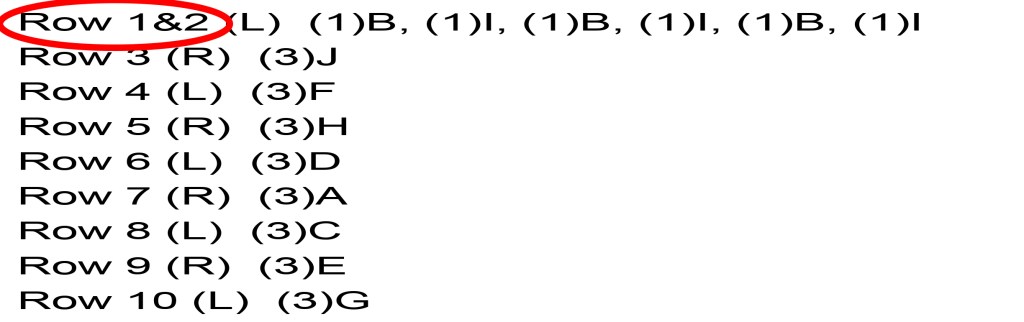
Before we jump in, let’s talk about the different ways a word chart can be written. There are two ways a word chart can start. The chart can combine both rows 1 and 2 together or the chart can start with just row 1 (this is done with a starter strip and we will talk more about starter strips in a later tutorial). Today we will focus on the word chart that combines both rows 1 and 2.
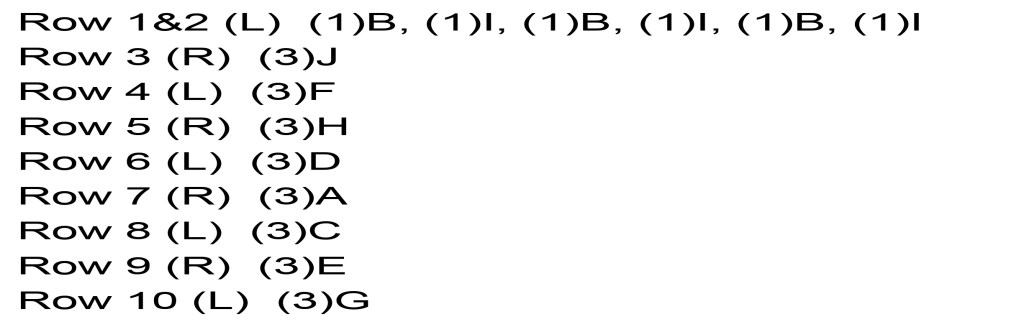
Let’s take a look at the word chart. This is how the word charts in my patterns look. They may look a little different from other designers’ patterns, but the way they are read is the same.
Let’s break down all the parts.

Row Number is which row you are working on

The L and R are the direction you are working in.
I normally ignore this on a pattern because this will depend on how you hold your beadwork when you are working. I tend to flip my beadwork so I’m always working right to left.
But knowing if you are working on a left or a right row can help if you lose your place, so this can be a very helpful bit of knowledge.

Next are the really important parts of your pattern. The number of beads, which are shown as a number within parentheses in my patterns.

And the bead color is represented by an uppercase letter in my patterns.
Different designers represent bead color in a variety of ways. They can be uppercase letters, like in mine, or they can be represented by a symbol, number, or something else. Each designer might do it a bit differently.
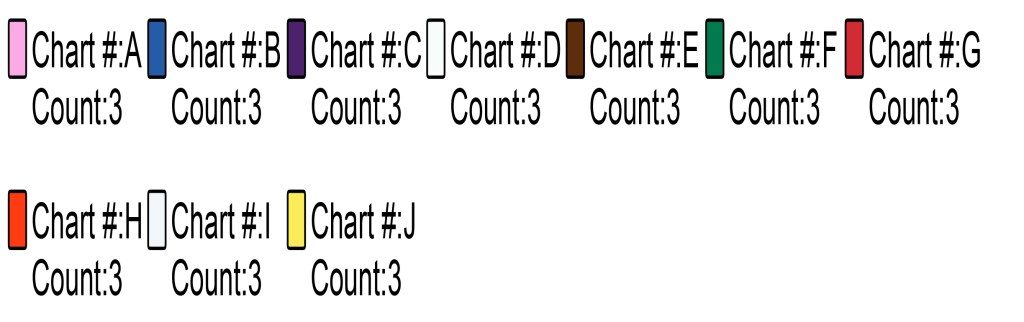
So how do you know what the designer uses? That will be represented by a legend like the one above. It might have more or less information, but it will give you all the information you need to know about how the word chart, as well as the graph, works.

So in our example today, you can see that pink is represented with the capital A and there are 3 beads, of that color, in this pattern.
So looking back at our word chart, we can see that our first row (our combined row of one and two) is white (I) and blue (B).
Row 1 is white
Row 2 is blue

Here is what it would look like on your thread.
The red bead is our stop bead and then working left to right we strung one blue (B), one white (I), one blue (B), one white (I), one blue (B), and one white (I).
Now we have our first two rows completed, so let’s make sure to cross off rows 1&2 on your pattern so you don’t lose your place. You can see how I keep my place while beading here.
Now that we have row 1 and row 2 on our thread, we’re going to start row 3.
In our example, row three is 3 yellow beads (represented by the letter J in our word chart).
Now hold up, you say. I thought this was an even count pattern, why are there three beads in each one of these rows? The last time I checked 3 is an odd number. You made a mistake.
I know this can be confusing, I know I was confused the first time I saw this. Think of each one of these rows as “half rows”. The beads are going to go in between the beads of the previous row, so we won’t be adding the full 6 beads in this example, we’ll be adding “half” of the row or 3 beads.
You also want to keep in mind that though the pattern says (3) J, we won’t be adding all three beads at one. If we did that, we would get a loop of beads at the end of our row.
This is kind of the tricky part about reading a word chart. You have to wrap your head around the fact that you have to count out the beads as you add them and they don’t all go together.
If you have trouble thinking about this, or if you are working on a large complex piece, you can always lay out the row of beads before you start. That way you just have to pick them up in order and not keep track of them in your head. They even make amazing bead boards that hold your little beads in neat little rows for you.

This is how it will look once you add those three yellow beads.
See how each row 3 beads (yellow beads) goes between the row 2 beads (blue beads).
Word charts always mess with my head because you added rows one and two, but the first bead you add (a blue bead in this example) is row 2, not row 1 and you end with a row 1 bead (a white bead in this example). I always have to remind myself that my thread will come out of row 1 and I will be adding to row 3 on top of row 1 and in-between row 2. That half-step-up always throws me off.
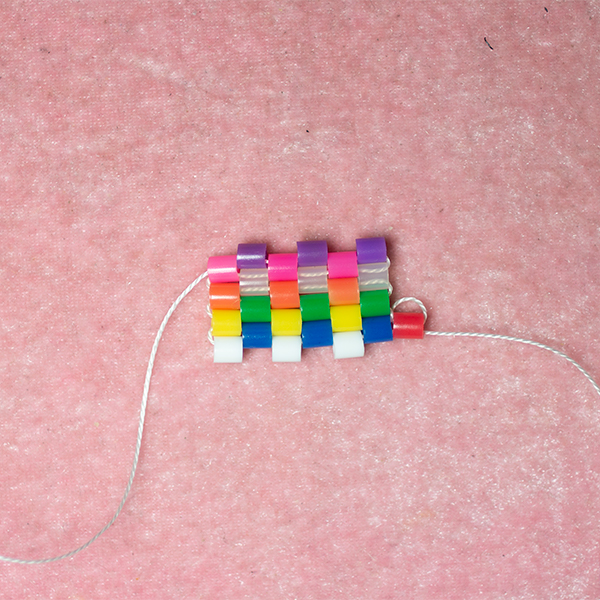
Okay, so now it’s time to add our fourth row, which will be 3 green beads (represented by F in this example). We will add them just like we did in row three.

Here is what it looks like when you’ve added the fourth row (three green beads).
You would just continue adding rows this way until you get to the end of the pattern.
And that is how you read an even count peyote word chart.
The toughest part in my opinion is getting started with that combined first row. Once you get past that and get your third row added, it’s pretty easy sailing.
So what did you think? Was there something I missed? Did this help get you started on that new pattern you just picked up? Let me know below in the comments what you thought of this tutorial.
Is there a tutorial that you really want me to do? Let me know in the comments. I’d love to hear from you.
Looking for more beady tutorials?
Even Count Flat Peyote Stitch – Click Here
Ladder Stitch – Click Here
Brick Stitch – Coming Soon
Square Stitch – Coming Soon
Two Drop Even Count Flat Peyote Stitch – Coming Soon
Odd Count Flat Peyote Stitch – Coming Soon
And many more!
Want to get beady updates sent right to your inbox? Maybe you’d be interested in a 25% off coupon? Sign up for my email newsletter today and get all that and more!


2 thoughts on “Tutorial: How To Read A Peyote Word Chart”